Receipt Printing Faint, Dark, Partial or Streaked? Thermal Print-Quality Troubleshooting (Start With the Self-Test)
A repair guide to thermal receipt print-quality faults — faint or light prints, vertical white lines, one-sided/partial printing and over-dark output. Use the self-test to split software from hardware, clean the head and platen, set print density, and know when the printhead is worn.
The fast triage
Faint, streaked, one-sided or over-dark receipts look like a failing printer, but the cause is almost always a dirty head, the wrong paper, or a density setting — all cheap to fix. The single most useful move is to print a self-test: it tells you instantly whether the problem is in software or in hardware. Triage in this order:
| Do this | What it tells you | |
|---|---|---|
| 1. Print a self-test | Self-test crisp but POS faint = software density | — |
| 2. Clean head + platen (alcohol, power off) | Removes residue that insulates the head | — |
| 3. Check paper side & grade | Wrong side / low-sensitivity stock prints faint | — |
| 4. Raise density, lower speed a touch | Darkens output cleanly | — |
| 5. Replace worn head or platen | When a sharp white line or fade survives cleaning | — |
What makes a thermal mark dark
A thermal mark is just heat applied to coated paper — so darkness depends on a short chain of factors. When a receipt prints faint, one of these links is weak:
Reading the print-quality symptom
Match the exact print-quality symptom to point at the cause:
| Symptom | Most likely cause | |
|---|---|---|
| Faint / light all over | Dirty head/platen, low density, or wrong paper | — |
| Vertical white line down the page | Debris on head or uneven platen; if it survives cleaning, a burned-out dot row | — |
| Strong one edge, fades across width | Uneven head-to-platen pressure; worn platen roller | — |
| Blank / nothing prints | Paper loaded upside-down (non-thermal side up) | — |
| Too dark, smudged, bleeding | Density too high / speed too low / over-sensitive paper | — |
| Dead block of dots | Printhead damage — replace the head | — |
The self-test: software vs hardware
Because it routes the entire repair, the self-test deserves its own step. Read the result like this:
| Self-test result | Meaning | Where to fix | |
|---|---|---|---|
| Crisp & dark; POS receipts faint | Hardware fine | Raise print darkness/density in driver or POS | — |
| Faint or light | Hardware / consumable | Clean head & platen; check paper; then parts | — |
| Vertical white line | Head contact or dot row | Clean; if it persists, replace head | — |
| One-sided fade | Pressure / platen | Reseat head; inspect/replace platen roller | — |
Step-by-step: restore print quality
Work the sequence in order — each step is cheaper and more likely than the next:
- 1
Print the self-test
Hold Feed while powering on. A crisp self-test points you at software density; a faint one points at hardware/consumables. - 2
Clean the head and platen
Power off, then wipe the thermal head and the platen roller with isopropyl alcohol on a lint-free swab. Residue insulating the head is the No. 1 cause of faint print.Caution: Always power off before touching the head; let it dry fully before printing. - 3
Confirm the paper
Make sure the thermal (coated) side faces the head and the stock matches the printer. A roll loaded upside-down prints nothing; low-sensitivity paper prints faint. - 4
Tune density and speed
Raise the print-density/darkness value and reduce speed slightly for darker, solid text. For smudging, do the opposite — lower density, raise speed. - 5
Replace the worn part
If a sharp white line, dead dot block, or fade survives all of the above, replace the printhead (or the platen roller for one-sided fade).
When it's a worn part
When cleaning and settings can’t cure it, the part has worn. Match the replacement to your printer:
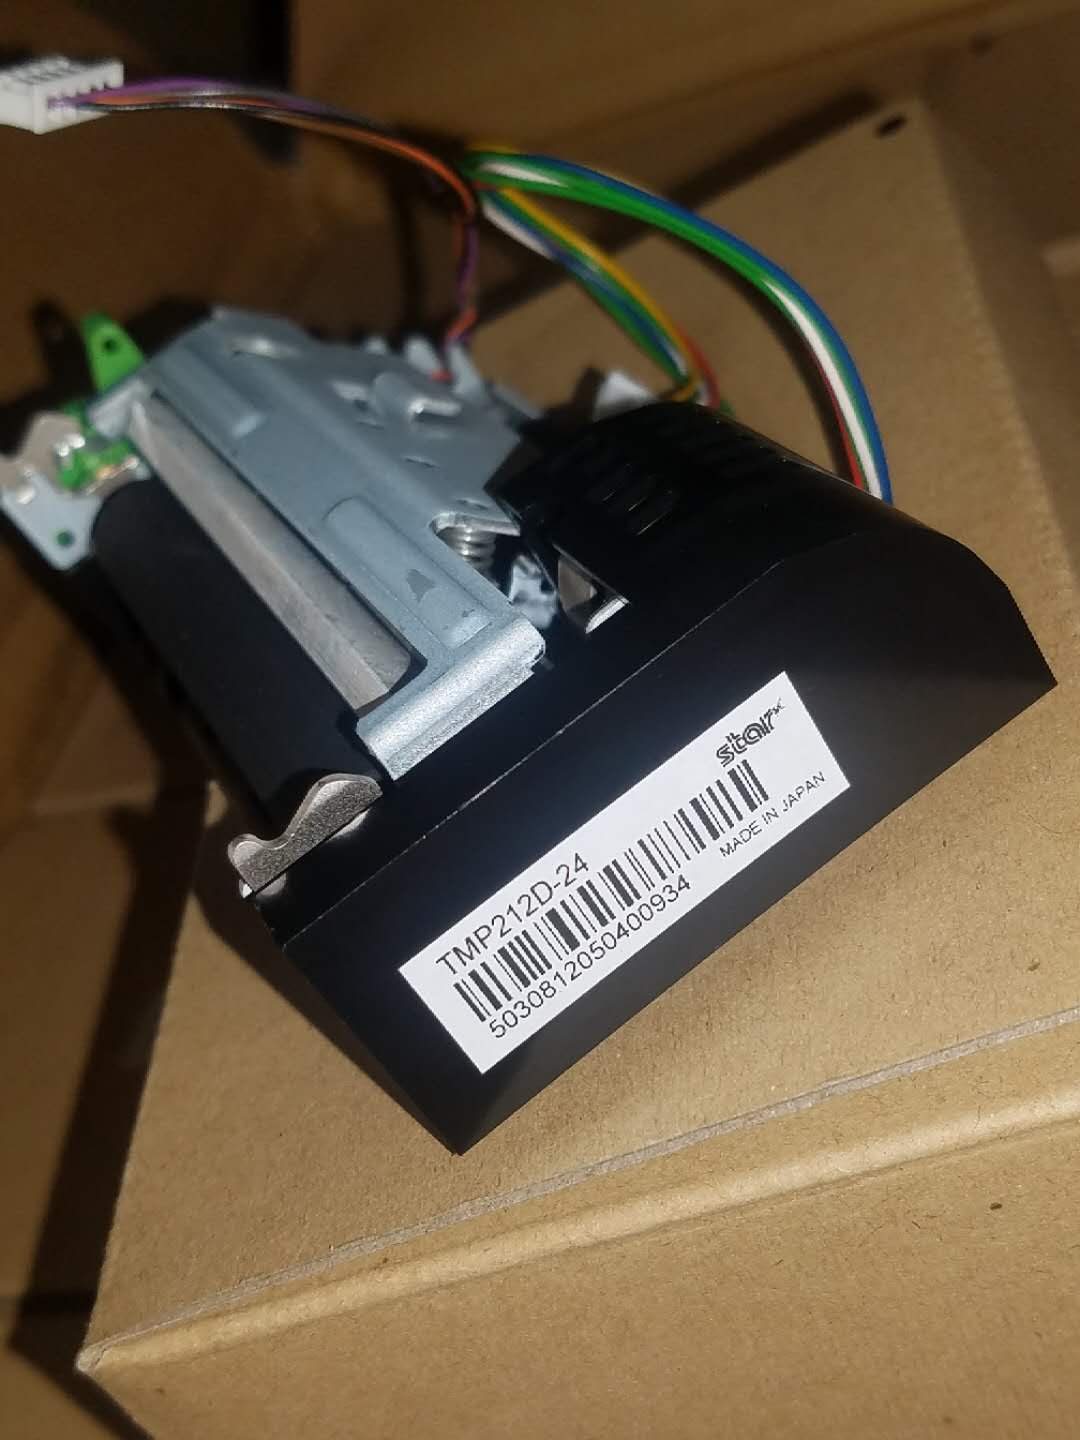
| Part | Symptom that points to it | |
|---|---|---|
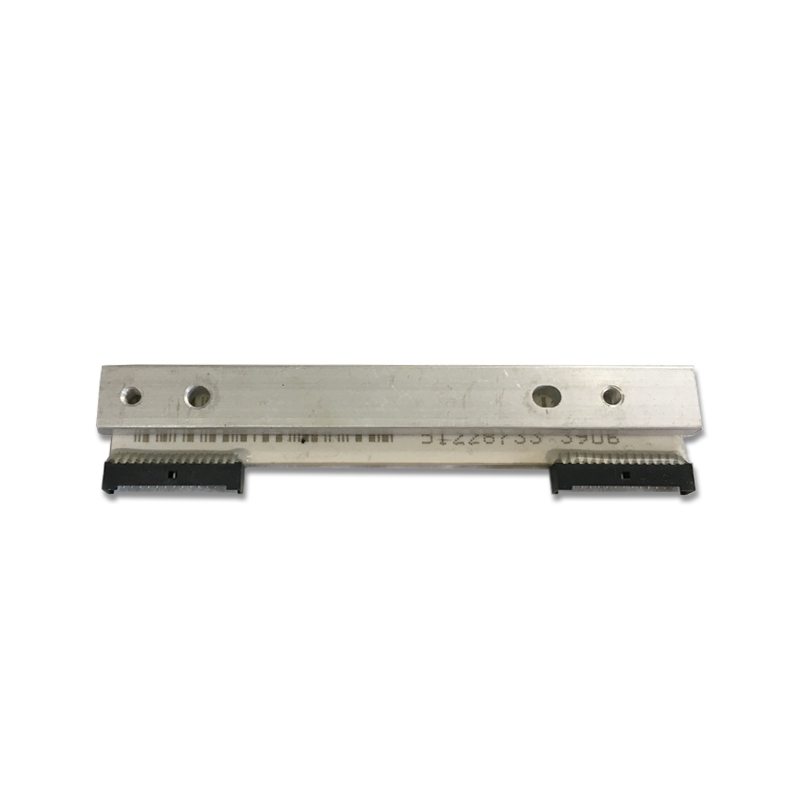
| Thermal printhead | Sharp white line or dead dot block that survives cleaning | — |
| Platen roller | One-sided fade, uneven pressure, flats on the roller | — |
| Thermal paper (right grade) | Faint everywhere despite a clean head and high density | — |
Browse replacements in our thermal print heads category, rollers & cutter parts, and full units in POS printers. For printhead replacement steps see our printhead replacement guide and to make heads last, our printhead lifespan guide. If the printer won’t print at all or has feed/connection faults, start with the general receipt-printer troubleshooting guide. Send us your printer model and a photo of the self-test and we’ll match the right head or roller.
Frequently Asked Questions
Why is my thermal receipt printer printing faint or light?
What does the self-test tell me?
What causes vertical white lines down the receipt?
Only one side of the receipt prints, or fades across the width — why?
My receipts print too dark or smudge — how do I fix that?
How do I know the printhead is worn out versus just dirty?
Sources & further reading
Related guides
Cash Drawer Wiring & Connection: RJ11/RJ12 Drawer-Kick, Printer-Driven vs USB, and the 12–24V Pulse
A POS cash drawer doesn't plug into the till — it's kicked open by a 12–24V pulse from the receipt printer down an RJ11/RJ12 cable. Get the interface, pins and voltage right and it just works. Here's the wiring, explained.
Read guide →Noisy or Failing POS Cooling Fan? Diagnose the Bearing, Clean It, and Match a Replacement
A grinding or whining POS fan is usually dust or a worn bearing — and ignored, it leads to overheating and shutdowns. Here's how to find the noisy fan, decide clean-or-replace, and match the right fan.
Read guide →POS Motherboard Failure: No Power, No POST, Bulging Capacitors — Diagnose Before You Replace
Before you condemn a POS mainboard, prove it's the board and not the power supply, the RAM, or a dead coin battery. A two-minute visual inspection plus the POST beeps usually tells you — here's the method.
Read guide →Related categories
Featured parts in this guide
Need the parts mentioned in this guide?
Genuine OEM and quality-tested aftermarket parts for IBM, Toshiba, NCR, Diebold, Wincor and Hyosung systems — with worldwide shipping.